Thursday, March 26, 2015

TechTip Thursday: How To Add A Picture To Word Document


Hey everyone! Today I will be talking about how to add a picture to your word document. It is a quick and easy process that will only take a few steps to do.

There are two ways to add a picture to a document. First is to select a picture from the files on your computer. The second would be to add a picture from an online source.

To add a picture from your computer click on insert, then Pictures.

From here a window will open up that will allow you to select different pictures from your computer and add them in. 


Once an image is inserted into your document, you can made the appropriate edits to the picture under Format in the top ribbon. Be sure to select Wrap Text and select Tight. This will allow your picture to move around text and fit in to any space you want. You can also adjust the picture in other ways depending on where you want it located. 


For online pictures just select the Online Pictures located next to the Pictures icon. You can search your OneDrive or Bing search to find the image your want. Once the image is inserted, do the same kind of formatting like you did in the previous step.


There you have it! You can get more in depth by looking at the different options and trying out what works for you to see what you like. 

Check back next week for another TechTip!

Follow, Like, Share!

Twitter, Instagram : @discoverehub

Facebook: DiscoverE Hub


Thursday, March 19, 2015

TechTip Thursday: How to Add Music to PowerPoint 2013

Hey everyone! Today I'll be talking about how to add audio to your Power Point. It's quick, easy, and everyone can do it.

In all recent versions of Office with the ribbon interface, you have to click on Insert and then click on Sound or Audio at the far right. In PowerPoint 2013 – AIFF, AU, MIDI, MP3, WAV, WMA plus MP4 audio are accepted.
In Office 2013, you’ll see the Audio on My PC Record Sound, and Online Audio options.


If you already have an audio file you would like to import, then go ahead and choose Audio on My PC. The audio file has to be in one of the formats mentioned above.
Choose Online Audio if you want to search Microsoft Online collections for free sounds. Just type in a search term and a list of available free sounds will appear. Click on any item to insert the audio into your presentation. Sometimes you won’t find very many or any sounds using this option..
The Record Audio option is straightforward and works very well. A small audio recording dialog pops up and you just press the record button to start a new recording.

Press stop, click OK and the recorded audio will be inserted into current slide of your presentation. This is a super easy way to add some voice overs to your slides.
Once you have added the audio using any of the above methods to your presentation, you can click on it and you will see a new menu called Audio Tools appear at the very top.

If you click on Playback, you will see a bunch of options like PreviewBookmarksEditing, and Audio Options. To hear your audio just press Playback.

There you have it! You can get more in depth by messing around with the editing options and customizing to how you want the audio to play.

Check back next week for another TechTip!

Follow, Like, Share!

Twitter, Instagram : @discoverehub

Facebook: DiscoverE Hub


Thursday, March 12, 2015

TechTip Thursday: Fix An Android Phone That Will Not Charge.


Hi everyone! Today I will be talking to you about a problem that every Android user has faced at least once. Your phone not charging. This issue can be the result of multiple causes and can be fixed by trying these easy solutions.


USB Port Repair 


When you constantly plug in and remove your USB charging cable, it can cause issues with the charging port on your phone. The charging end of your cable may not be connecting with your phones port. This issue is the a common cause of charging failure and may fix your problem.

In order to begin repair you will need to shut off your phone, remove your battery, if possible, and find a pin or needle small enough to insert into your phones port. You can then carefully use your pin or needle to move the inner tab part of port up so that it will align with your charging cable.


Change Cables


You get used to using the same cable over and over again. So you don't really consider the possibility of it ever going out. That cable and block may stop working after a long period of use. Always check to replace the cable first since it is the cheaper of the two. If getting a new cable does not work, then try replacing the block. Finally always double check to make sure the cable you are using is compatible with you phone. It doesn't happen often, but it is always a possibility.


Replace Your Battery


Sometimes you get to the point where you phone just will not charge at all. Your first thought maybe to replace the phone if all other attempts to fix it have failed. Before you decide to do a complete replacement of the phone, get a new battery first! Simply switching out a battery can solve any almost any charging you have. Ask your phone provider if you are eligible for a free phone battery replacement.


If all else fails, it may be time to get a new phone. Also, stop by the your nearest phone providers store to see if they can help repair your issue.

Check back next week for another TechTip!

Follow, Like, Share!

Twitter, Instagram : @discoverehub


Facebook: DiscoverE Hub

Thursday, March 5, 2015

TechTip Thursday: Mac Can "Summarize"

Hello Everyone! There's a new hidden Mac feature that can help everyone with lengthy articles. The feature is called "summarize" and it is built into every Mac.

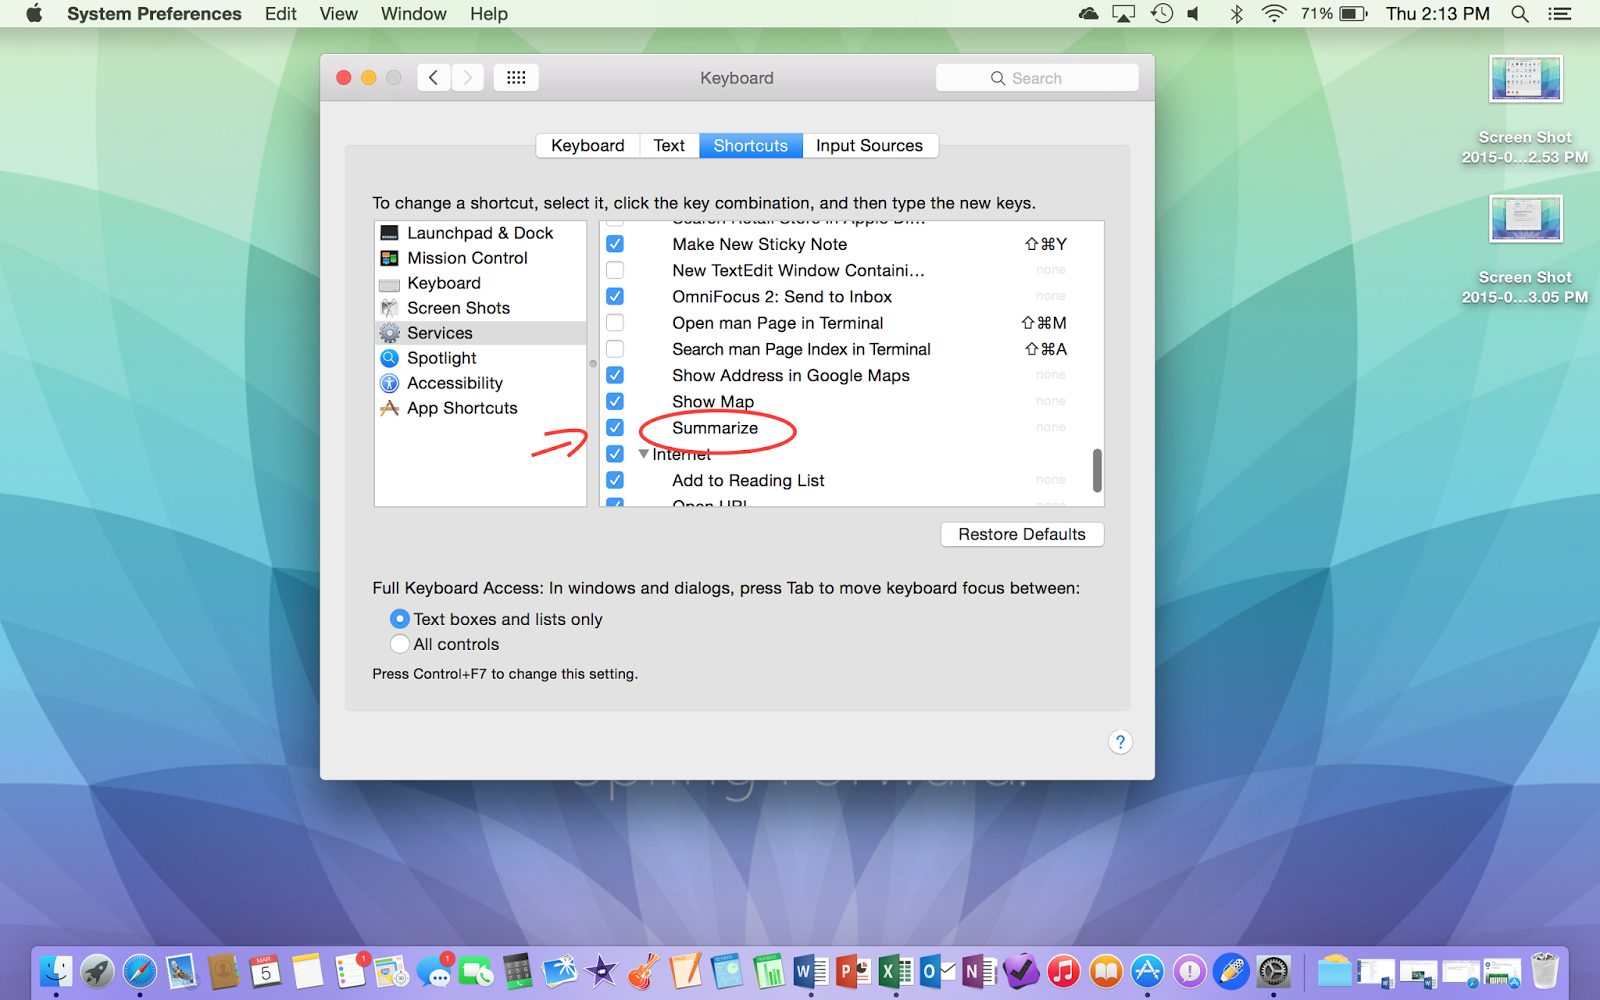
To enable this great feature you'll first want to open up system preferences and navigate to "keyboard".

 Next you will want to click on the "Shortcuts" tab.


Then you will want to click on "services" in the box on the left side.


Then you will want to find the "summarize" in the box on the right hand side.
Note: you may have to scroll near the bottom depending on how much is installed on your computer.


You now have summarize activated; to use the feature highlight a piece of text.


Go to "services" then click "summarize"


You'll get this box with the summarized text. You can use the slider in the box to move between 1 and 100 percent of the highlighted text. It will vary in length depending on what you select.

I hope you enjoyed this Mac tech tip this week, we post new tech tips every week so come again soon!

Thursday, February 26, 2015

TechTip Thrusday: Useful Extensions With Your Browser

Hello again! Today I will be talking about how to improve your browser experience through the use of extensions that are available for your browser. 

Extensions are like apps, but for your browser. Extensions can do a variety of different things such as blocking adds, downloading video, or even allowing your browser to interact with apps on your phone. 

Some extensions that I use on my chrome browser are AdBlock, Page Monitor, and Push Bullet.

AdBlock is an extension that can, as the name implies, block any and all ads from websites that you visit. This can also stop those pesky youtube ads that always seem to load faster that the video itself. Only draw back would be that AdBlock may interfere with access to some sites such as Hulu, however the settings can be set to make certain site exempt from being blocked.

Page Monitor is a simple extension that can keep track of changes that occur on a certain web page and notify you when those changes occur. You can set how often it checks and how it notifies you. So you will always know when a sales happens on your favorite clothing site. 

Push Bullet is an extension that allows for interaction between your phone and browser. It enables you to response to text messages from your browser, store notifications, and send links or notes to any device that you have Push Bullet on. It is very easy to use and customize. 

In order to see if any of these extensions and more are available for your browser, check out the links below for each store. 

Chrome

Internet Explorer

Firefox

Safari

Check back next week for another TechTip!

Follow, Like, Share!

Twitter, Instagram : @discoverehub 

Facebook: DiscoverE Hub

Thursday, February 19, 2015

TechTip Thrusday: Own A Lenovo? You Could Be At Risk To Attacks.

Hi and welcome to another TechTip Thursday. Today I will be taking about a severe problem with certain Lenovo devices. Recently it has been discovered that Lenovo has been installing an adware software on to their new devices. The adware known as Superfish is a very dangerous program that allows itself to access any data from sites that you visit regardless if you have a secure connection or not.

The adware functions by monitoring websites you access and gathers information that it then uses to send to advertisement companies. The software even functions under secure connections by communicating with the site you are accessing and telling it that you are secure. However, this is a big problem since the software itself is not secure. The right person with an open access point along with the right software could monitor a Lenovo user, gather all their information, and send false updates along with malware to their devices.

If you have a Lenovo immediately find out if you have this on you device. To test you device and see if you are infected use this site. In order to remove this software you will need to follow these instructions .

Alternatively you could wipe your hard drive and then reinstall windows, which if you have the know how and resources, I would highly recommend.

Good Luck and Be Safe!!

Check back next week for another TechTip!

Follow, Like, Share!

Twitter, Instagram : @discoverehub 

Facebook: DiscoverE Hub

Thursday, February 12, 2015

TechTip Thrusday: 5 Ways To Protect Your Online Information.

Hey everyone! Today I will be talking about one of the most important things when using the internet, Security. I will give you a list of tips that can keep you safe!

Keep your operating system / app up-to-date: Your everyday computer use is something you do not want to be interrupted. So you usually ignore popups or prompts to update. This, can put your self at risk. App or system updates keep your devices safe and allow them to function properly by having everything with the latest software.

Invest in free online protection software: Everyone should be secure with how easily you can access free software. There are always threats that can harm your computer when surfing the internet. Being cautious and alert will always benefit you. Here is some free software that can help keep you safe.

AntiMalware

Mac: ClamXAV
PC: Malwarebytes

AntiVirus

Mac and PC: AVG

Create a secure password: Now I know what you're thinking, "No one will guess it" or "It takes to much time". Well taking the short time to update you passwords can save you a world of headache. Keeping your password too simple, using the same one for multiple sites, or leaving the default one can put you at risk. Doing so makes it easier for people to gain access to your personal information. Here is a list of the 25 most used passwords in 2014. If you have anything close to these or similar you can be putting you and your information at a great risk.

Watch where you click: Everyone has to deal with pop up ads now and again. They are fairly easy to ignore or you can block them completely with ad block . Sometimes you can make the wrong click and end up installing malware or viruses. So be careful of the sites you go to and what you click. If it sounds too goo to be true, don't click.

Don't click .exe: Getting this type of file is normal when you are installing a program. However, if you receive this type of file in an email from an unknown source. DO NOT OPEN. This type of file is a virus and will infect your computer. Always check to see who you receive emails from.

Enjoy! 

Check back next week for another TechTip!

Follow, Like, Share!

Twitter, Instagram : @discoverehub 

Facebook: DiscoverE Hub

Thursday, February 5, 2015

TechTip: Free Useful Software For Your Computer

Hey everyone! Today I will show a list for FREE programs you can download to do various tasks on your computer without having to buy an expensive paid version. Also, remember to always check to make sure you are downloading the correct version and be sure all the correct settings are chosen when you being installation.

Aseprite - A really nice program for making Pixel Art.
GrafX2 - Bitmap paint program, mainly used for Pixel art.
Game Salad - 2d game engine with drag and drop feature that does not require programming.
GXSCC - Turn ANY song into an 8-bit NES song. 
AOMEI - PC backup and restore software.
Pixelarteditor - Powerful pixel-art editor with multitouch support for Android.
Flex - Application that allows you to easily build mobile applications for iOS, Android™, as well as applications for browser and desktop.
GraphicsGale - In case you didn't like the other Pixel art tools that I already mentioned.
Starling - Cross platform game engine.
TexturePacker - Drag and drop graphics in the program and it will generate spritesheet.
Anti Spyware - In my opinion this is just as good (if not better) as Malwarebytes.
Photorec lets you recover deleted or damaged files from hard drives and flash memory. You can even pull stuff off of a drive that has been formatted.
Gyazo - Free screen shot and gif maker that is easy to use.
Chrome Remote Desktop - Allows you to set up your computer so that you are able to access another person's or your own computer over the internet. 
Microsoft Office - (Free for Fresno State students) - come by the hub to find out how to download this full office suite for free.
Caffeine Windows Mac - This software will keep your computer on without falling asleep by the click of a button in your tray.

Enjoy! 

Check back next week for another TechTip!

Follow, Like, Share!

Twitter, Instagram : @discoverehub 

Facebook: DiscoverE Hub

Thursday, January 29, 2015

TechTip Thursday: Resolving Basic Tech Issues

Hello everyone! Welcome to another TechTip Thursday. Today I will be discussing some simple solutions to resolve basic tech problems. Issues such as your phone freezing or running slow can possibly be solve by doing any one of these solutions. 

On/Off - Easy as that! With some devices the first thing you should try is turning it completely off and on again. Doing this can allow your phone to work again or force close the app that is causing the issue. If your device is frozen and won't allow you to turn it off, then just let the device run until it is out of power or pull the battery from the back of the device, if possible. 

Free Up Memory - sometimes your internal storage can be too full causing your device to slow down. You can delete apps your don't use, music, pictures, or video. Anything that takes up memory can affect you. 

Hard Reset - This is a last resort for your phone. Doing this will completely restore you phone to when you got it the first day. DO THIS AT YOUR OWN RISK. You will completely lose any thing you have on your phone. You can reinstall apps from your apple or android account, but any data saved on the phone will be lost.

There it is! If you have any questions about anything I talked about today, come by the Hub or contact us on social media. 

Check back next week for another TechTip!

Follow, Like, Share!

Twitter, Instagram : @discoverehub 

Facebook: DiscoverE Hub

Thursday, January 22, 2015

TechTip Thursday: How To Change Start Up Programs On Mac And PC

Hello again! Today I will be showing you guys on how to change which programs begin on start up. There are different ways to do it for Windows 7, 8, and Mac.

Mac

Mac OS X 10.3 or later
  1. Log in as the user who wishes to have a login item or as an admin user.
  2. Choose System Preferences from the Apple menu.
  3. Choose Accounts from the View menu.
  4. Click the name of the user.
  5. Mac OS X 10.3.x: Click the Startup Items button.
    Mac OS X 10.4 or later: Click the Login Items button.
  6. Click the "Add {+}" button.
The item you selected will automatically open the next time you log in.

Mac OS X 10.2.8 or earlier
  1. Log in to Mac OS X as the user who wishes to have a login item (See tip 1).
  2. Choose System Preferences from the Apple menu.
  3. Choose Login Items from the View menu (tip 2).
  4. Click Add.
  5. Select an application or document in the dialog box that appears.
  6. Click Add (tip 3). 
The item you selected will automatically open the next time you log in.
Windows
Windows 7:

  1. Press Win-r . In the "Open:" field, type msconfig and press Enter .
  2. Click the Startup tab.
  3. Uncheck the items you do not want to launch on startup.
  4. When you have finished making your selections, click OK.
  5. In the box that appears, click Restart to restart your computer


Windows 8:

  1. Press Ctrl + Alt + Delete
  2. Select Task Manager
  3. Click on the Start Up tab near the top of the window
  4. Highlight any item by clicking on it 
  5. Enable or disable any application by pressing the button on the bottom right

There you have it, if you have any questions, contact us on social media or visit us at the Hub.

Check back next week for another TechTip!

Follow, Like, Share!

Twitter, Instagram : @discoverehub 

Facebook: DiscoverE Hub


Thursday, January 15, 2015

TechTip Thursday: Word to PDF and PDF to Word

Hello everyone! Glad to see everyone again this semester. Today I will be talking about how to save a Word document as a PDF file and how to convert a PDF file to a Word document.


First we will go over on how to save a Word document as a PDF.


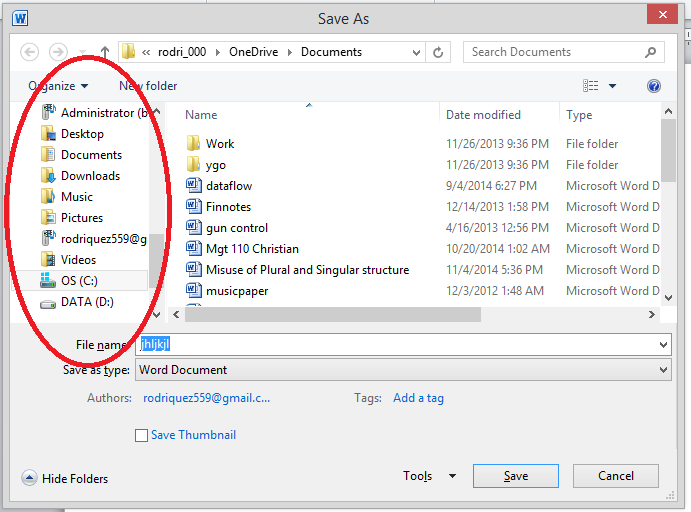
After your document edited, save it. You can click on the file menu and click on save as. This is demonstrated by the GIF below.


From here you can select where your document will be saved.


After you have selected a destination, you can select the file type on the drop down box named Save-As Type and select PDF


Finally you can click save and it will bring up your newly saved PDF.


There you have it! A newly saved PDF file. Now I will show you have to convert that same PDF file back to a Word document.

Usually this is a feature that is included with your Adobe reader, but it will cost money to use this feature. The free and easy way is to use a website that can do this for you. Doing a simple Google search for "PDF to Word converter" will yield many different results. Some will require sign up and others have a limited usage amount. I will show you a site that I personally use for this that has proven to be reliable.

The site is: https://www.pdftoword.com/ this site provides an easy way to obtain converted files through your email but only allows 5 free converts per email.

As you can see below, you can select what file type you want to convert to. There are a few different options for to select from, but we'll just focus on PDF to Word. Simply follow the instructions on the site and it will email the converted file to the address you enter.


Once you receive the file you will be asked to download it. If you do not see the email in your inbox, check your spam folder for it. 


There you have it, if you have any questions, contact us on social media or visit us at the Hub.

Check back next week for another TechTip!

Follow, Like, Share!

Twitter, Instagram : @discoverehub 

Facebook: DiscoverE Hub

Thursday, January 8, 2015

TechTip Thursday: Fun Google Searches

Today I will you show some different fun searches you can do with Google that will give you interesting results! Type any of these phrases and Google will give you a surprise!

Atari Breakout

Typing this into Google's image search will begin a game of breakout using the images as blocks. This classic game is fun and addictive so don't spend too much time!!!


Do A Barrel Roll

This phrase will cause you Google search to spin around in a circle. This is phrase is from the popluar StarFox game for the Nintendo 64.


Here is a list of other cool searches you can try:

Blink HTML

Zerg Rush

Tilt 

Google in 1998


Check back next week for another TechTip!

Follow, Like, Share!

Twitter, Instagram : @discoverehub 

Facebook: DiscoverE Hub


Thursday, January 1, 2015

TechTip Thursday: ALT Codes.

Hey everyone, back again with another helpful tip. Every wonder how to get those unique characters like this ↓>☺♦♣. Well today I show you the easy way to do this as well provide a guide showing all the ALT codes. 

So in order to get these unique symbols, you will need to make sure your NUM Lock is on. This button allows you to use your key pad.

 Once you have it on you can begin by holding down ALT, then punching in the appropriate code number for the symbol you want. Finally release ALT and you will have your symbol! 

Here is a list of the different ALT codes:

These are just a few different codes you can enter. You can find more the Google searching "ALT Codes". This is just a quick reference to some that are commonly used.

Oh, and Happy New Year!!!

Check back next week for another TechTip!

Follow, Like, Share!

Twitter, Instagram : @discoverehub 

Facebook: DiscoverE Hub